
Bridges
Bridges are a popular treehouse accessory and add to the adventure and fun of moving around in the trees. A bridge can be used to access a treehouse from either the ground or another tree, or can lead to a different treehouse or platform.
Types of bridge
A solid bridge is usually wooden and spans A to B as a level walkway with railings. Solid bridges are limited in span by the strength of the timber. Long spans can be supported by posts down to the ground or cables up to the trees. A bridge without any extra support would be limited in practicality to about 10' (3.3m). The beams in the bridge undergo tension and compression forces in use. The attachment points at each end will have to support the expected weight acting downwards, but will not be under significant tension.
A rope bridge is a form of suspension bridge. The rope can be any high strength cable which has limited stretch. Nylon rope and steel cable are the most common cables used for treehouse bridges. Rope bridges rely on their connections at each end. They are always under tension so attachments need special consideration to take into account both weight (vertical load) and the tension of the bridge (acting horizontally).
Solid bridges
A wooden bridge can make a good entrance walk to a treehouse built on a slope. As the tree will move in the wind, one end of the bridge must be allowed to move. It is usually easier to have the moving end on solid ground (much like a ship's gangway), but the bridge could also be fixed to the solid ground and allowed to slide in a special bracket at the treehouse end.
Rope bridges
Rope bridges can be dangerous to build and use. They require skill and common sense to install safely. Failure to design a safe system can lead to serious injury or death. For anything other than low, short spans, contact a professional for further advice or to build the bridge for you - see the list of contacts at the end of the page.
The simplest rope bridge consists of a cable to stand on and a cable to hold onto with your hands. This design is quick and easy to build but can be tricky to walk along. The situation can be improved by offsetting the hand cable to one side, which allows the walker to stand more vertically.
The next improvement is to add a second hand cable so that the arms are spread out, improving balance. In this design, the lowest cable takes most of the weight. To improve the stability of the bridge, the foot cable can be tied up to each of the hand cables using short lengths of cable at regular intervals forming a railing. This also improves safety in case the walker slips. The higher the hand cable is, the greater the stability, although the highest that most people are comfortable using is around shoulder height.
Suspended walkway
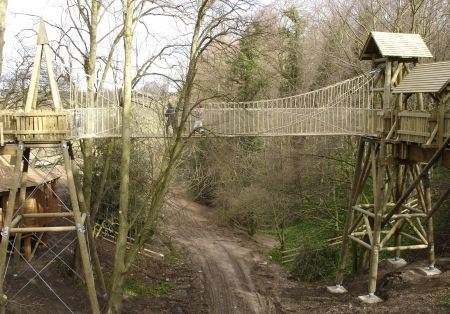
A better form of rope bridge, in terms of ease of use, has a wooden deck running below the hand ropes. When set up correctly, this bridge is stable and safe for even small children to use. Typically two high strength deck cables are strung between A and B, at the same height and with a horizontal separation of 2-3' (30-90cm). The boards for the walkway are then either tied or bolted to the cable so that they can't move or work loose. Two hand cables, which can be of slightly lighter material, are strung 3-5' (90-150cm) above the deck cables. Ties are then connected between the hand rail and deck rail on each side. The ties can be made from a single rope which runs up and down along the whole length of the bridge. Separate cables (usually rope), or mesh can be strung along the ties to hold them in position and reduce the risk of anyone slipping out between adjacent ties.
Cable attachment
Due to the high tension in the bridge cables, they should be fixed to a sufficiently strong point on the tree, treehouse or the ground. The attachment points will be under a lot of pressure, so attaching directly to the tree is preferable. A heavy duty eyebolt (see the cables page) is the best fixing point. Slings around the tree are stronger but can cause damage to the bark and restrict growth. In order to get enough separation between the cables you may need to use a thick piece of wood as a spreader to hold the cables at the correct distance apart.
Large spans may require additional cabling from the tree at each end of the bridge to another point such as a tree directly behind. The cable should be fixed lower down on the second tree. This spreads the bridge's tension over two trees which reduces the pressure on the main tree and gives a more solid fixture to the bridge. This method also needs to be used if the bridge cable is fixed to a small branch of the tree because the branch could snap under high tension. Run another cable either back to the main trunk if it is behind the branch, or back to another tree.
Tensioning cables
Rope bridges require tension to keep them as level as possible and to avoid excessive sway. This makes a properly tensioned bridge easy to walk across. Unfortunately, a bridge with a wooden deck can become very heavy after only a short span, so it becomes impossible to get enough tension in the cables by hand strength alone. You can get round the problem using a block and tackle system, turnbuckles or a ratchet mechanism. A block and tackle allows you to increase the tension several times higher than you can normally pull by hand. Turnbuckles allow extra slack to be taken up once the cable has been tensioned, but as they have only a limited distance capacity they are best used with steel cables which don't stretch as much as rope. A ratchet mechanism is a steel device that can be cranked with a lever to gradually draw in the excess cable. You can buy ratchet mechanisms for zip lines which will work well on a bridge, or you can adapt the mechanism from a high capacity ratchet strap.
It is very important that all your hardware is rated to withstand the tension built up in a rope bridge, as it can take only one part to fail for the bridge to collapse. The tension in the cables can be fairly high even before anybody adds their weight by walking across and will increase even more as the wind blows the trees backwards and forwards. The important thing is to maintain a good safety margin so that the hardware you use is well within its working limits. Attachment points and mechanisms should be regularly inspected and adjusted. Only one person at a time should use a treehouse suspension bridge.
The attachment points
For a suspended deck bridge, you will have four cables at each end of the bridge. Each of these cables must be fixed to something that can withstand the tension and vertical load of the bridge, even in a storm. The cables might be attached to the trunk of the tree, a branch, part of the treehouse, to the ground, or to a frame fixed to the ground.
The cables themselves should not be fixed directly to the support, but rather to an anchor point such as an eye bolt or sling. Attachments to parts of the tree must be made carefully to avoid damaging the bark. If you use slings, they should be pulled tight to prevent movement in use and should be removed and inspected each year to prevent restrictions to the tree's growth. Eye bolts tend to cause less damage than wrapping ropes or slings around the tree and can be left in place permanently. Eye bolts in the style of lag bolts (ie a 6-8" threaded section), should be fitted at 45-90° to the direction of pull. This lowers the risk of the bolt pulling out under load, but requires special attention to the working load of the bolt under angular forces. Long bolts passing all the way through the tree can take much higher loads because they can be lined up with the cable.
If you attach the cables to the treehouse itself you will need to ensure that the parts can transmit the tensile force of the cables safely into the tree. Tying the cables to the edge of the deck or to a railing is not safe and can fail if the parts are not reinforced.
Practical tips for building rope bridges
- Reinforce the attachment points at each end to ensure they can easily take the tension in the cable.
- Unless you are going to take the bridge down each year for adjustment, use eye bolts instead of straps/ropes around branches to avoid tree damage.
- Use a backup cable for each hand and deck cable in case of unexpected failure.
- Climbing rope is a high strength cable material, but must be of the non-elastic kind, sometimes called a 'static' rope.
- If using rope, use a length that can span the gap in one go. Knots will lower the strength.
- Ensure decking is smooth where it will contact the cable to avoid damage.
- Attach any decking to the cables using U-bolts for steel cable or rope/straps for rope cables.
Safety
- Test the bridge over a few days using some dead weight in the middle, eg timber, large containers of water or sand bags.
- Stay off the bridge in stormy weather.
- One person at a time.
- Children should always be supervised.
- Consider fitting a gate if you have young children.
Example treehouse bridges
- Cedar Creek 'Rainbow Bridge' and 'Sun Bridge' - large scale cable bridges built at ground level and raised to 80 feet.
- Nelson Treehouse - video of some of their bridge projects.
Professional rope bridge builders
For the highest level of safety, have your rope bridge built for you by professionals with experience in this area. For long or high spans this is essential.