
Types of support | Flexible supports | Rigid framed supports | Fixtures and fastenings | Metal brackets | Cables
Knee braces | Dangerous things to avoid | Non-flat surfaces | Improving stability | Building without trees
Knee braces
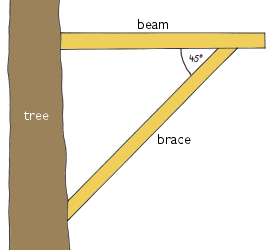
Knee braces are used a lot in treehouses, particularly for treehouses in single trees. They can be strong and withstand a lot of load, but must be built properly in order to do so. A simple knee brace looks like the diagram on the right.
The most important joint of the whole system is where the beam meets the tree. The problem is that you are trying to form a joint to hold the very end of the beam against the flat surface of the tree and there is a lot of tension at this point because the angled nature of the brace acts as a pivot. This tension tries to pull the beam away, so the joint must be strong.
To construct this knee brace, a metal bracket is necessary to withstand the force produced at the beam-tree joint. The other joints (beam-brace and brace-tree) are also strongest done using metal, but wood can be used instead (see below). Metal brackets are expensive to have made.
The beam-brace joint
As shown in the diagram above, the brace meets the beam at 45 degrees. This angle can be adjusted, but try to keep it at least 45 degrees to avoid too much pressure on the beam-tree joint. The weight of the beam and its load will attempt to force the brace away from the tree at the top because it is angled. Here are some simple ways to form this joint:
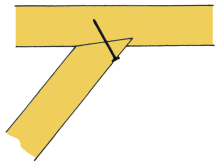
Notch cut in beam, with lag bolt
The cut angles of the end of the brace and the notch in the beam must be accurate so the beam and brace fit closely together. The lag bolt holds the whole joint in place so it can't slip apart.
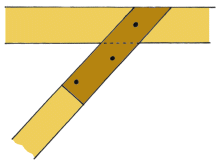
Two pieces of wood with bolts
A piece of wood is through-bolted to each side of the brace. When you are ready to fit everything, the brace is held against the beam, a hole is drilled, and a bolt (or two) is fitted. ¼" steel may be used in the same way instead of the wood.

Two pieces of plywood with bolts
Similar to using solid wood, but less bulky. More bolts are required to get the best strength out of the plywood. Again this is quite simple, as any excess ply can be trimmed back once the brace is fitted.
The beam-tree and brace-tree joints
The brace may coincide with a curving or uneven section of the tree surface and so requires care to fit properly. The upper beam-tree joint tends to pull away from tree, so bolt the horizontal support directly to the trunk or use a metal bracket to bolt the beam into. Brackets provide a stronger joint and allow supports to radiate out perpendicular to the trunk. Bolting to the trunk restricts the number of 'spokes' possible (if one tree is used) and produces a layout that is not symmetrical through the middle of the tree which may lead to problems fitting your joists accurately. However, strength is not usually compromised by a non-symmetrical design.
For the lower brace-tree joint, avoid cutting pieces out of the tree to fit the brace neatly. This is very harmful - it can allow infections to enter and damage the wood you are relying on to hold the brace up. I fitted each brace in my treehouse against a block (which I call a base block). It was simply a piece of 2x4 or 2x6 bolted onto the tree. The end of the brace is then cut in a 'V' shape to rest on this block. The brace will stick there under its own weight, but you can bolt it down to the base block for security in windy conditions. A brace will be able to withstand more weight if the force exerted at this joint is channeled straight into the tree. A brace bolted to the side of a trunk is fine for normal loads but if a lot of weight is applied the bolt may shear or the wood split around the bolt hole. The more expensive approach, as mentioned earlier, is to have a metal bracket made that the brace slots into. This is easier to assemble at the tree and is stronger than a wooden base block.
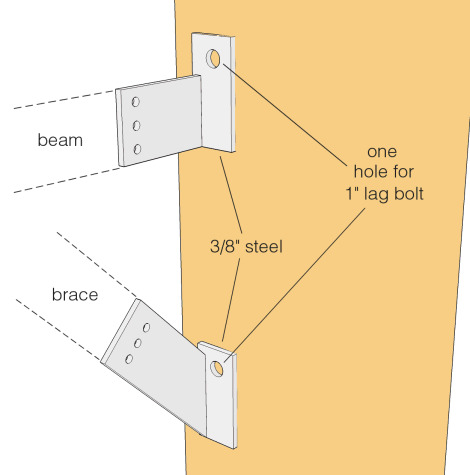
Example brackets
These brackets would be suited for smaller treehouses using 2x6 or 2x8 for the beam and knee brace. The brackets are welded together from 3/8" steel plate, which should be treated to prevent rust. The protruding part of the bracket is bolted to the beam or brace using 1/2" bolts.
Putting up knee braces
Beams are usually cut longer than needed to support the floor on treehouses. The ends can then be decorated or used as support for railings, or can cut them back when the treehouse is complete. The way I put up the knee braces under my treehouse is pretty universal. They were in the style of diagram b above. First, all the wood is cut. A rope is attached to the beam which gets hoisted into position. At my treehouse, I fastened one end of the beam to another part of my supports.
Now the beam has one end fixed to the tree and is supported temporarily by the rope. The brace is raised into position with another rope and the tree end bolted. The rope holding the beam is adjusted and a spirit level used to fine-tune the position. Once the beam is level, the brace is positioned to meet it. Holes are drilled and long bolts go through everything to hold the parts securely together.
To put up a brace like diagram a, more adjustments and fine-tuning need to be made. The notch in the beam is pre-cut and the beam set in place. The brace is positioned against the notch and marked off. Once cut to the correct shape, the brace is re-fitted and everything bolted together. This is the cleanest and simplest joint and although is can be time-consuming to prepare it is a superior joint in terms of form and function.
Material to use for knee braces
These supports are fundamental to the integrity of your treehouse. Good quality wood is essential. In particular, look out for any signs of knots, cracks or splitting at the ends of the timber. These parts must be in top condition so they will not fail under the load of the treehouse. 6x2s are good for a small/medium treehouse. The braces must also be very straight, with no twists so that they won't bend under the weight. Look along the timber from one end to see any curvature. Using thicker, more square sectioned material helps avoid this situation too.