
Treehouses | Houses on posts | Builders | Accommodation | Plans, articles, books
World treehouse list | Building the Fulton treehouse | Alnwick treehouse | Treehouse personalities
Patrick Fulton's treehouse
My treehouse | Photos | Diagrams | Creatures in the forest | Removal | Previous treehouse projects
After I built a small treehouse in my garden (see previous projects) I decided that the next stage was a new one which would be larger, higher and more hidden. I chose a nearby forest and got to it. Having a limited budget, I salvaged a lot of wood from a nearby demolished house, and found some bits and pieces lying round that could be used to get things started. The original design of the treehouse was as a square, 1.2m x 1.2m (4ft x4ft) with lightweight framing and plywood walls.
Finding the tree and first supports
After much searching around the forest, which I have come to know very well now thanks to the treehouse, I found a particularly healthy looking beech tree that rose higher than the surrounding birch and pine. It also had a split trunk about 2m (7ft) from the ground. These twin trunks continued in parallel up to a height of around 12m (40ft) where each split in two again. I began the floor by nailing two main support beams across the gap. Getting these two first pieces of wood in place was a lot of work. To get to either end I had to climb halfway down the tree to where I could cross the gap and climb back up the other trunk. After fixing one end of each beam I was able to get a spirit level in place to secure the other. I used nails to fit these supports, but this is not advised and is discussed on the fixtures page in the building section.
This stage of building a treehouse is always full of anticipation and excitement as you suddenly get a picture of where and how the treehouse is going to fit in the tree. I am still amazed to this day when standing on a level platform way up at the top of a tree. This is one of the major attractions of building treehouses. The sense that you have been able to master the seemingly inhospitable location and transform it into somewhere where you can relax and take in the amazing view the height affords is worth all the pulling on ropes and dragging wood through the forest!
The floor is put in place
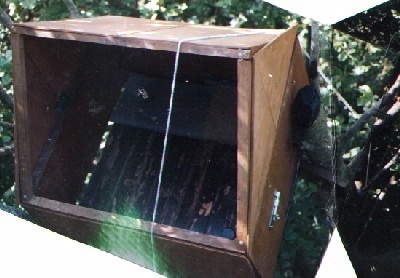
The floor was ceremoniously laid on top of these primary supports, two sections of an old sliding wooden door that fitted the space perfectly and suddenly gave me a new base. Once the floor was secured with more nails it was time for the framing. I had pre-fabricated a frame out of 2"x2", joined at the corners with right angled brackets. This was gradually raised in pieces and screwed together. From this point, I could see how the treehouse would look, and it seemed quite small! Undaunted, I proceeded to raise and fix 9mm plywood wall sections, nailing them to the framing. The slightly wobbly frame became rock solid on the addition of these walls, although I would recommend screwing panels in place to avoid loosening previously made joints with your hammering.
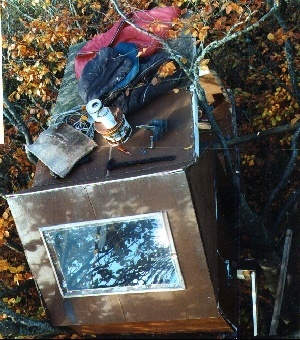
A hole was cut in one roof and a Perspex (plastic) window fitted. This was preferred over glass in the event of a branch coming through in a storm. The whole structure was coated with water-resisting preserver to protect it from the inclement Irish weather. A door was cut in a convenient side wall, hinges and a bolt were fitted and it was done!
Well, not quite...
Once inside I decided to jazz the place up a little, and painted the walls a light colour to make the space more airy. I also fitted some fluffy carpet which really made the treehouse feel much more comfortable. At this point I was very pleased with what I'd managed to build! It was 16.4m (54') from forest floor to treehouse floor. Soon though, the desire to build came back and I decided that what was needed was some more space. This was to be an extension (known on these pages as the 'old extension' - there were two) heading out from the side of the treehouse that had a pitched roof with no window in it.
More wood was salvaged and extra support beams were placed lower down the tree. Diagonal braces held up the overhanging end of the extension, which added an extra metre (3') to the length and more head room to move around in. I was particularly pleased with the way this section went because it took some difficult aerial engineering to get the supports in position without falling out of the tree! Around this time my main home was being done up so I managed to bag more carpet and a surplus small double glazed window. Very sophisticated.
After some painting and the installation of a low powered lighting system of strategically placed small bulbs, this treehouse was really something to behold. Then it was broken into.
I usually left a few tools up in the treehouse to save carrying them home and back every day. A lot of these were stolen, things were thrown around and out of the tree and the door was off its hinges. I was pretty upset by the whole thing as I'd imagined few people could get up this tall tree. Not to be outdone, I decided to repair with security in mind.
Another extension
The new extension I added was made of better quality materials. All the wood was sourced from a local timber yard and a corrugated Perspex roof fitted to let in lots of light. This part of the treehouse was designed to hold back anything likely to hit it, except perhaps fire. The old part of the treehouse was separated from the new by a very heavy door fitted with a Yale lock, as used on normal houses. The area underneath the Perspex was easily accessible through an unlocked outside door, reducing the risk of entry via the roof. The extension could in effect be shut off from the rest of the treehouse. When I visited I could fold back the big door completely and use all the space inside. I fitted a working fireplace in the old extension which was a great bonus on cold days and evenings - otherwise useless off-cuts could be put to good use heating the chilly air inside (more about the fireplace, including how to build one, can be found in the treehouse building section of this site). Again the treehouse was vandalised.
This time the lock was at fault - it simply wasn't good enough. The repairs involved some heavy steel brackets and a very solid padlock. This simple solution worked well. Unfortunately from then on I was plagued by occasional attacks on the treehouse which damaged several exterior features. The Perspex was smashed, roofing felt (tar paper) was torn away, and the treehouse needed maintenance most times I visited due to the new water damage that had occurred.

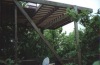
The deck
The next project at the treehouse was a deck. One of the best things about being at the treehouse, as I mentioned earlier, was the feeling of being up above everything else in your own little safe look-out spot. It seemed sensible to me to expand on this idea and make the most of what this tree, which stood taller than much of the surrounding forest, had to offer. I planned out a simple deck that would be positioned above the treehouse itself. In its construction, the deck was a much larger structure than the treehouse. It stood on legs disappearing down through the leaves to fixing points 4.5m (15ft) below, and had a surface area on top of 12sqm (130sqft).
Photos: Deck and the view
Treehouse demolished - November 2002
The Country Park owners remove the treehouse.
My treehouse | Photos | Diagrams | Creatures in the forest | Removal | Previous treehouse projects
Treehouses | Houses on posts | Builders | Accommodation | Plans, articles, books
World treehouse list | Building the Fulton treehouse | Alnwick treehouse | Treehouse personalities